
Proper Fit Custom Dress Shirts
You took advantage of our unique buy 4 get 1 free promotion with the "test" shirt on your first order and have now received your "test" shirt from execshirts.com. Please make sure that you have laundered and pressed it before moving on to confirm the fit.
Below we will provide examples of how a "typical" dress shirt should properly fit. The Blue Shirt on the left is what we would consider a proper fitting dress shirt, the White Shirt on the right we believe is too large.
After you have finished checking your test shirt against the information below, you will need to send us an email and tell us whether the shirt fits properly or where it needs to be changed (+/-) and by how much. DO NOT send us new/revised measurements, please just send us corrections of the shirt we have already sent you, since this will be the most accurate way to get a proper fit on your custom dress shirts. We maintain very accurate Quality Assurance records on every shirt on every order, so simple adjustments are the best way to make your changes.
We want to stress that the information below is only our "guidelines", the MOST important determination on whether a shirt fits properly or not is up to the wearer of the shirt. Some customers like their shirts tapered close to their frame, some like their shirts a little more baggy with more room in the Collar. Determining the proper fit is really up to you the customer, but we provide these guidelines to assist you.
Once you have confirmed whether the test shirt fits or not, you need to send an email to our Customer Service Team (customerservice@execshirts.com) to communicate that. We need to know if the shirt fits, and if it does not fit, exactly where to make changes and by how much (e.g. Chest/Waist/Hips +2"). We also need to know if the test shirt is wearable or if we need to make a replacement shirt.
Remember to take into account shrinkage when making your changes, all shirts will shrink a little with washing, 100% Cotton shirts will shrink more than a shirts made of a Cotton/Poly mix. Egyptian Cotton shirts and Linen shirts will shrink the most.
Another thing to remember is that all our shirts are cut by hand not by machine, so every shirt will have slight size variances (+/-), usually larger. The amount of the variance allowed depends on the part of the shirt. If you give us EXTREMELY minor changes we may not be able to make them due to the normal variances with hand tailored dress shirts.
Get started by following the steps listed below:
Proper Fit Collar
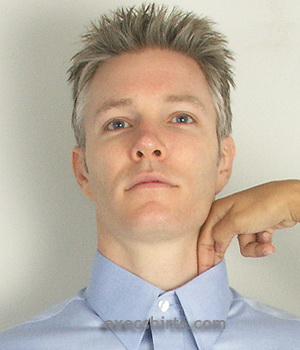
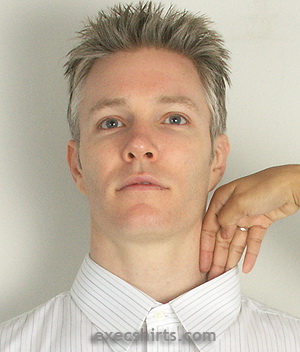
Your Collar should fit loosely around your Neck and you should be able to easily place one or two fingers (depending on size of fingers) inside the closed Collar. The White Collar is too large where we can easily place three fingers inside.
Proper Fit Shoulders
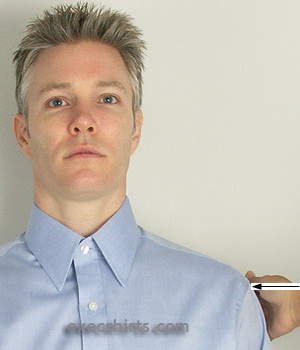
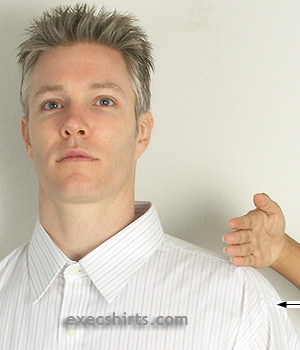
The edge of your Shoulder should just exceed the seam of your shirt where the Shoulder and Sleeve are sewn together. The seam should only go slightly over the Shoulder.
On the White Shirt the seam hangs over the Shoulder by 2" on each side and the Shoulders should be smaller, to correct this problem you would indicate "Shoulders -4" since we need to take in 2" on each side. (The White Shirt is EXTREMELY large and this is for demonstration purposes only, most changes will not be this large).
One thing to remember, if you try to take in the Shoulders too much; in our example above if you take in the White Shirt by 5" or 6" that is going to make the Shoulders "bind", especially when you raise your arms. Also, reducing the Shoulders is going to "pull up" the Sleeves by some amount, you will learn more about this below.
Proper Fit Torso
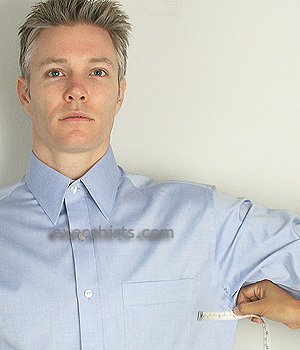
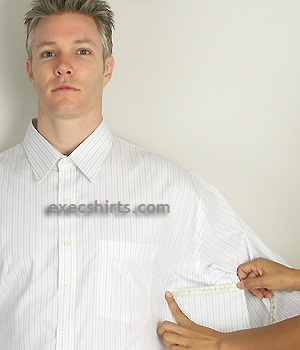
Your torso (Chest/Waist/Hips) should have some extra fabric to ensure a comfortable fit. In the photos above the arms are extended horizontally and we have pulled all the fabric over (exaggerated) to one side of the torso to get a total measurement; the fabric is flush (not tight) on the side of the torso not visible in the photos. The photos above illustrate checking the additional fabric in the Chest area but you would copy this procedure in the Waist & Hips as well.
Using the methodology described above you should easily measure about 3-4" on the one side. The White Shirt has 6+" or about 2" extra of measured fabric, to correct this problem you would indicate "Chest -4"; since we are only measuring the front half of the shirt and need to also take into account the other side.
Remember, how much additional fabric you have in the torso area is really a matter of personal preference, there is not a right or wrong here. Customers trying to get an "extreme" taper where the contour of the shirt closely matches their frame can do that in most, but not all circumstances. If you have a "V" shaped torso with large Chest and small Waist/Hips we can tailor your shirt and still maintain a natural contour in the shirt. If you have a large Chest, small Waist and wider Hips, it is not possible to take too much material in at the waist, or the shirt will loose its natural contour.
Proper Fit Sleeve Length
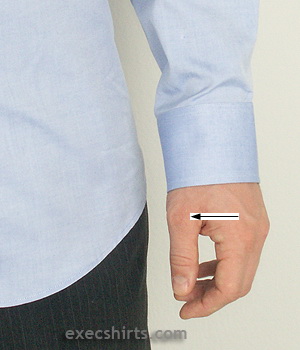
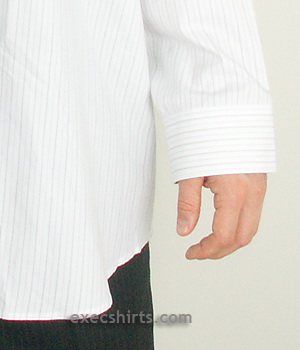
Your Sleeves should come to rest naturally about 1 to 1 1/2" above the first knuckle on your Thumb. The White Shirt comes to rest below the first knuckle so the Sleeves need to reduced by 1 1/2 to 2" (personal preference).
Before finalizing any Sleeve changes; remember that Shoulder changes can have an impact on your correct Sleeve length. If you reduced your Shoulders above by 1 /1/2 - 2" you would want to increase the Sleeves by about 1/2" to maintain correct Sleeve Length.
Other Special Measurements
A couple of special measurements that you do not really need to worry about, but which we can tailor for you, are Sleeve Width and Cuff Width. We cut these in a standard size based on your torso unless you specify that you want a special cut in each of these areas. We measure Sleeve Width by measuring along the seam where the Sleeve attaches to the Shoulder on the Sleeve side of the Seam. In the photo above that would be 9". If you wanted the width here larger by 1" you would just tell us to cut Sleeve Width 1" larger. We recommend that you mention how much you want us to increase this rather than giving us a number, just in case you do not measure it correctly.
Another thing about changing Sleeve Width is that it changes the cut at the Chest. If you decrease the Sleeve Width it will raise the point the Chest is cut and the shirt might bind in the back or when you raise your arms, just something to think about, since we have seen it happen before. If you increase Sleeve Width it will lower the point the Chest is cut and give you more space in the back and arms but might give your bicep area a baggy look. The decision is totally yours, we just give you this advice to help you make a better decision.
Another special measurement is Cuff Width, we measure Cuff Width on the inside of the cuff, along the base of the cuff, from outer edge to outer edge. In the photo above the Cuff Width is 9". The center hole of the cuff or the center hole of the button is usually set in 3/4" in from the edge of the cuff. If you wanted to reduce the Cuff Width you would measure the cuff and tell us to increase/decrease the cuff width by the appropriate amount (e.g. 1/2"). If you try to make the Cuff Width too small you might not have good range of motion there, especially if you wear a large watch.
Remember that everything we have told you here is a guideline, your personal preferences are up to you. Sometimes all of the specific measurements on a custom shirt can be overwhelming, so we give you these guidelines to tell you what you might consider "normal" tailoring. If you have any questions please feel free to contact us.
Remember that everything we have told you here is a guideline, your personal preferences are up to you. Sometimes all of the specific measurements on a custom shirt can be overwhelming, so we give you these guidelines to tell you what you might consider "normal" tailoring. If you have any questions please feel free to contact us.